After the Storm: A Homeowner's Guide to Roof Damage Inspection in Ontario
Severe weather across Ontario can put even the best-built roof to the test. Wind gusts strong enough to tear shingles loose, hail capable of bruising asphalt and denting metal, ice storms that load eaves with hundreds of kilograms of weight, and falling branches that puncture the deck — all of it happens every year in the Ottawa Valley. Knowing how to assess your roof storm damage in Ontario, document it properly, and decide whether to call a professional can save you from leaks, insurance disputes, and far costlier repairs down the road.
This guide walks through what to do in the hours and days after a major storm. It covers what you can safely check yourself, what requires a professional eye, and how to handle the paperwork side if a claim becomes necessary.
The First 24 Hours: Stay Safe Before You Inspect
Before climbing ladders or walking the property, give the area time to settle. Power lines may be down, branches may still be falling, and roofs that look intact from the ground can have hidden weak spots from impact damage.
From inside the house, check ceilings and upper walls for fresh water stains, drips, or bubbling paint. Bring a flashlight up to the attic and look at the underside of the roof deck — any wet spots, daylight visible through new gaps, or shifted insulation are immediate red flags. If you find an active leak, contact us about emergency roof leak repairs before water damage compounds.
Outside, walk the perimeter at ground level only. Look up and around the entire roofline. Do not climb onto the roof itself unless you have safety training, proper equipment, and ideal conditions. Damaged roofs are slippery, structurally compromised, and dangerous.
What Each Type of Storm Damage Looks Like
Different weather events leave different signatures. Knowing what each one looks like helps you describe the damage to a professional and your insurance company.
Wind Damage
Sustained high winds and gusts are the most common cause of storm damage in the Ottawa Valley. Look for:
- Missing shingles in obvious gaps along the field of the roof
- Lifted, curled, or creased shingles — even a single crease can break the waterproof seal
- Shingles displaced into the yard, on the driveway, or caught in gutters
- Damaged or missing ridge cap shingles along the peak
- Bent or detached flashing around chimneys and vents
- Loose or dangling soffit panels and fascia trim
Wind damage often appears in patterns — entire rows or sides of the roof are affected because the wind hit from a specific direction. Even shingles that appear in place can have broken seals underneath, which is why a professional inspection after a major wind event is worth the call.
Hail Damage
Hail leaves smaller, less obvious marks. Our guide to hail damage covers the specific bruising signs to look for on asphalt shingles. Key indicators include:
- Dark "bruise" spots where granules have been knocked off
- Shiny dark patches on freshly hit areas (asphalt freshly exposed)
- Excessive granules collecting in gutters and downspouts
- Dents in metal flashing, vents, valleys, and gutters
- Cracked or split shingles, especially older ones
Most insurance companies have strict time limits for filing hail damage claims, so prompt action matters.
Ice and Snow Damage
Winter storms create damage that may not appear until thaw cycles begin. Watch for:
- Ice dams along eaves and in valleys
- Drooping or detached eavestroughs from ice weight
- Interior water stains appearing during midwinter thaws
- Shingles displaced by sliding snow on steeper roofs
- Damaged or missing snow guards on metal roofs
For homes that experience repeat ice issues, our existing ice dam prevention overview covers the underlying causes and long-term fixes.
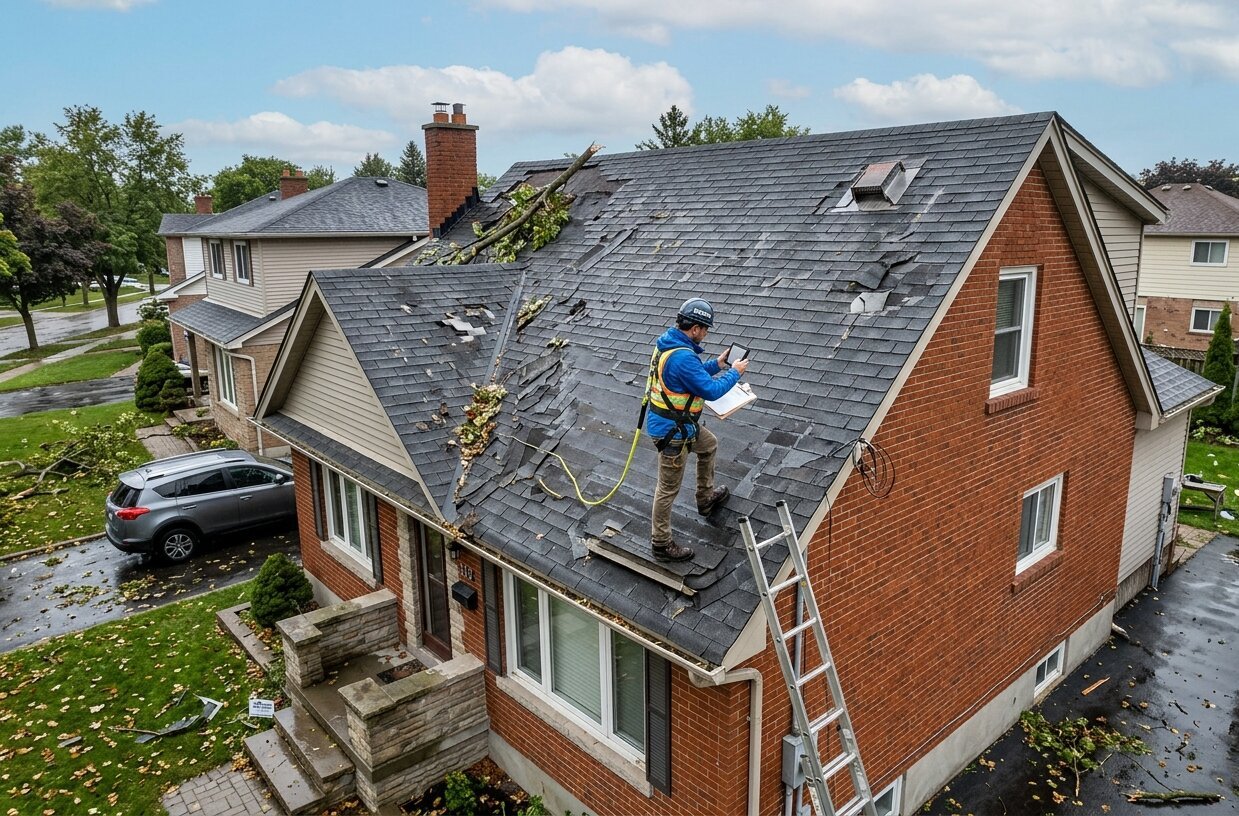
Falling Debris and Impact Damage
Branches, tree limbs, and large hail can puncture or crack the roof deck. Signs include:
- Visible holes or split shingles where impact occurred
- Cracked or broken shingles in concentrated areas
- Tree branches still resting on the roof
- Bent vents, antennas, or skylights
- Dented metal panels on steel roofs
Impact damage can puncture the underlayment and the deck itself even when the surface looks minor. A professional inspection is the only way to confirm the depth of impact damage.
Inspecting From the Ground: What You Can Safely Check Yourself
You can gather useful information without climbing on the roof. Walk the entire perimeter of your home with a notepad or phone in hand. Look for:
- Missing or displaced shingles visible from below
- Granule loss in gutters and downspouts (a sign of hail or aging shingles)
- Damaged flashing around chimneys, vents, and skylights — visible as bent or missing metal pieces
- Sagging gutters, separated joints, or detached downspouts
- Loose or dangling soffits and fascia along the eaves
- Tree damage — fallen branches, limbs leaning against the roof, debris caught in valleys
- Interior signs — fresh ceiling stains, peeling paint, attic moisture
Photograph everything from multiple angles, even if the damage seems minor. Date and time stamps on the photos are valuable for insurance.
When to Call a Professional Roofer
Some storm damage requires a professional eye on the roof itself. Call us if you see or suspect any of the following:
- Active leaks inside the home
- Visible structural sagging, deformation, or sections of missing roof
- Large branches resting on the roof
- Punctures or holes in the roof surface
- Significant displacement of shingles or panels
- Damage suspected after a major hail event, even if you cannot see clear bruising from the ground
- Anything you are uncertain about — a quick professional roof inspection is far cheaper than waiting for a hidden leak to develop
For storm damage that is causing active water entry, our roof repairs team can stabilize the situation with temporary protection while a full assessment is completed.
Documenting Damage for Your Insurance Claim
If the damage is significant enough to file an insurance claim, thorough documentation is the difference between a smooth approval and a frustrating dispute. Insurance adjusters work from evidence, and the evidence you provide will shape the outcome of your claim.
Build a complete documentation file:
- Photos and video — from multiple angles, ground level only unless safe access is possible. Include wide shots of the whole roof and close-ups of specific damage
- Date and time stamps — most phones add this automatically; verify the settings are on
- Weather records — note the date of the storm, severity, and any local weather alerts. Environment Canada records can support your timeline
- Interior damage photos — ceiling stains, wet walls, attic moisture
- List of affected items — damaged contents, displaced gutters, broken windows, anything storm-related
- Receipts for any emergency tarping or stabilization work you authorize
Our guide to roof insurance claims covers the claim process in more detail, including what claims adjusters typically look for and how to work with them effectively.
Common Mistakes to Avoid After a Storm
In the rush after a major weather event, homeowners sometimes make decisions that create bigger problems. The most common mistakes:
Hiring storm-chasing contractors. After major storms, out-of-area contractors often appear in affected neighbourhoods offering fast roof replacements. Many disappear the moment the work is paid for, leaving no one to honour the warranty. Always verify that any contractor you hire is established locally with a verifiable history. Our guide on why to choose local roofing contractors covers what to look for.
Climbing onto a damaged roof yourself. Storm-damaged roofs are unstable. Even minor-looking damage can hide deeper structural issues that fail under a person's weight.
Waiting too long to inspect. Small storm damage that is not addressed becomes large damage. A loose shingle becomes a leak, a leak becomes a rotted deck, and a rotted deck becomes a full replacement.
Signing repair contracts under pressure. No reputable contractor will demand immediate sign-off. Take time to get multiple quotes for significant work, and never authorize repairs from someone unable to provide a written estimate.
Skipping insurance documentation. Even if damage seems minor, photographing and noting it protects you if hidden issues surface later.
Preventing Damage From the Next Storm
Once you have addressed any current storm damage, take steps to reduce vulnerability for the next event. Practical preventive measures include:
- Annual professional inspections, especially before winter and after major storms
- Trimming tree branches that overhang the roof or threaten to fall during high winds
- Replacing aging shingles before they become a wind-damage liability
- Installing snow guards on metal roofs to control snow release
- Upgrading to wind-rated shingles during your next roof replacement
- Ensuring proper attic ventilation to reduce ice dam formation
- Following an autumn maintenance routine to catch small issues before they become storm-related failures
A well-maintained roof handles storms dramatically better than a neglected one. Most of the catastrophic storm damage we see in the Ottawa Valley happens to roofs that were already in marginal condition.
When You Need Help, We Are Here
Storm damage can be stressful, but you do not have to figure it out alone. If your roof has taken a hit and you want a professional assessment, McKay Roofing has been responding to weather-damaged roofs across Lanark, Perth, Carleton Place, Almonte, and the wider Ottawa Valley for more than 50 years. We provide thorough inspections, clear documentation that supports insurance claims, and honest recommendations on whether repair or replacement is the right path forward.
Concerned About Storm Damage?
Get a professional assessment of your roof. No charge, no obligation.
Fill out the form or reach us directly.
Call us at (613) 259-5766 or contact us to schedule your inspection.