
Preparing Your Home for a Roof Installation: A Homeowner's Checklist
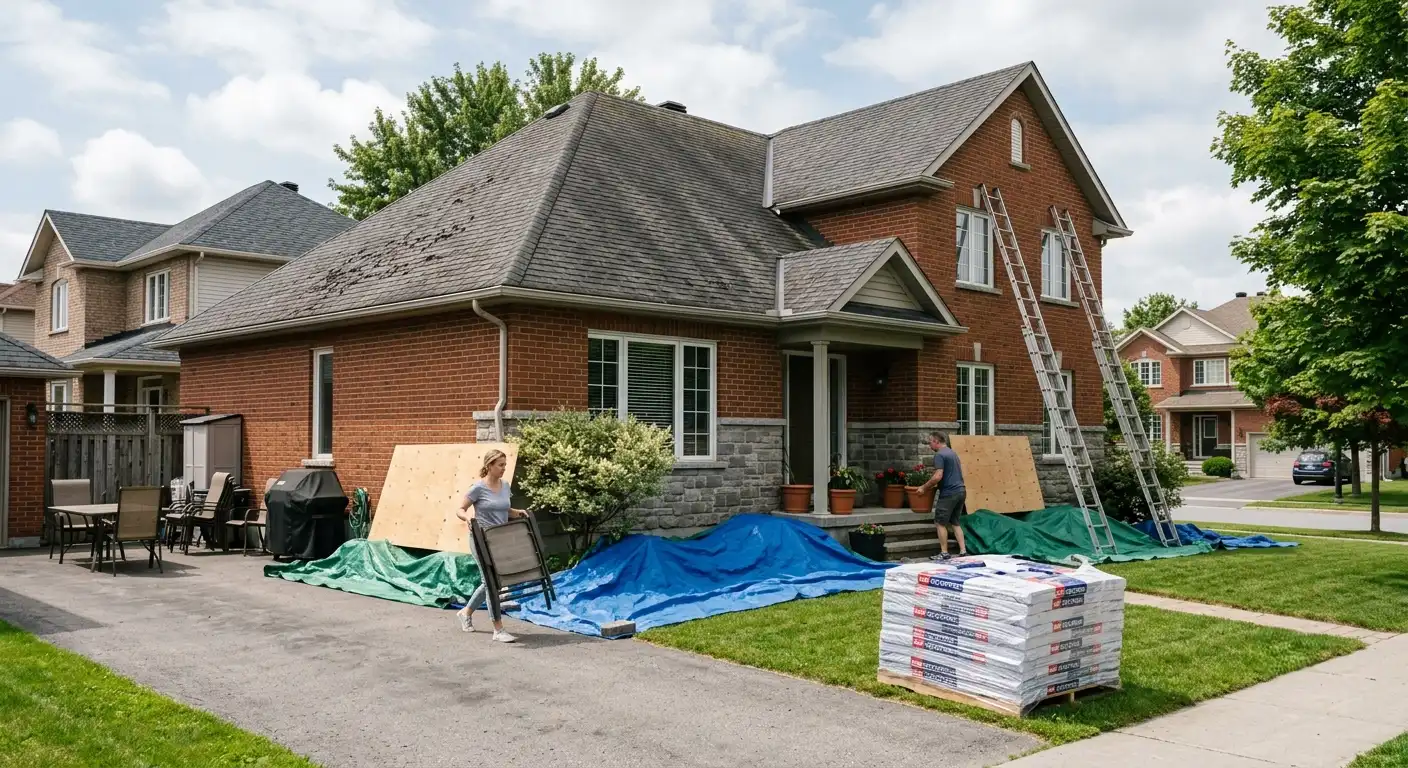
A roof replacement is one of the largest projects most homeowners undertake, and while your roofing contractor handles the roof itself, a well-prepared home makes the whole project run more smoothly. Small steps taken in advance protect your belongings, minimize disruption, and let you enjoy the transformation instead of scrambling on the morning the crew arrives. This guide walks through everything Ottawa Valley homeowners should do to prepare — inside the home, outside the home, and around the household.
After more than 50 years managing residential roofing projects across Lanark, Perth, Almonte, Carleton Place, and the broader Ottawa Valley, we have learned that the homeowners who prepare thoughtfully consistently have better project experiences. This checklist reflects what actually matters and what tends to get overlooked.
Why Preparation Matters
Roof installation is loud, dusty, and vibrationally active. Impact from nailing, tear-off, and material movement transmits through the house structure. Debris — nails, granules, torn shingle fragments — inevitably makes its way onto the property despite thorough cleanup. And the crew needs access to specific areas that homeowners often have items in.
Preparing in advance addresses all of this. A prepared home protects wall art, ceiling fixtures, attic-stored items, and outdoor belongings. It also lets the crew work efficiently rather than working around obstacles that could have been moved in advance. The result is a faster, cleaner project with less risk of accidental damage.
1–2 Weeks Before: Planning and Communication
Preparation starts before installation day. Once your project is scheduled, use the lead time to handle communication and larger decisions.
Confirm the Schedule
Verify the start date, expected duration, and any weather contingencies with your contractor. Ottawa Valley weather can shift plans, and knowing the backup dates helps you plan the rest of your week. Our from quote to completion guide covers what a typical project timeline looks like.
Notify Neighbours
A short heads-up to immediate neighbours goes a long way. Tell them the date, the expected duration, and that noise levels will be significant during tear-off. Most neighbours appreciate the notice and adjust their own plans accordingly. This small courtesy avoids strained relations and unexpected complaints.
Plan for Household Members
Decide in advance where sensitive household members will be during the loudest phases. This may include:
- Young children who nap during the day
- Family members who work from home and need quiet
- Anyone with noise sensitivity
- Elderly relatives who may find the disruption difficult
Many homeowners arrange for these family members to spend at least the tear-off day elsewhere.
Review Warranty Expectations
Confirm what warranty documentation you should expect after the installation, and where you should store it. Our guide on understanding roof warranties in Ontario covers what to expect from manufacturer and workmanship coverage.
Confirm the Scope in Writing
Make sure the written contract clearly specifies the work being done, materials being installed, and any add-ons like eavestrough replacement or ventilation upgrades. Any last-minute additions or changes should be discussed and documented before the crew arrives. Our guide on choosing a roofing contractor covers what a complete contract looks like.
Interior Preparation
The inside of the house needs attention before installation day. Vibration and dust travel further than most homeowners expect.
Remove Wall Art and Decorations
Take down anything hanging on walls that could shift or fall during heavy impact from above. This is especially important for:
- Framed art and family photos
- Mirrors, especially large ones
- Wall-mounted televisions on brackets
- Shelving with objects on it
- Anything hanging from ceiling hooks
Store items flat in a safe location for the duration of the project. Reinstall after cleanup is complete.
Protect Ceiling Fixtures
Ceiling fans, pendant lights, chandeliers, and any ceiling-mounted item should be considered vulnerable. Tighten mounting screws where possible. Chandeliers and decorative fixtures can be covered with soft cloth bags to catch any dust that shakes loose from above.
Cover Sensitive Furniture
Fine furniture, pianos, upholstered pieces, and anything with an easily damaged finish should be covered with light drop cloths or old bedsheets. Dust filtering down from the roof deck through the attic accumulates over the course of a project, and covering vulnerable items prevents cleaning frustration afterward.
Clear the Attic
Anything stored in the attic is directly beneath the work zone. Vibration during tear-off can dislodge items or cause them to shift. Boxes may end up dusty, damaged, or knocked from stacks. Where possible:
- Remove valuable or fragile items entirely for the duration
- Cover remaining items with drop cloths or plastic sheeting
- Consolidate stacks so nothing tips
- Move items away from potential ventilation openings where debris might enter
Store Vibration-Sensitive Items
Musical instruments, collectible glassware, delicate figurines, aquariums, and anything else that could suffer from sustained vibration should be moved or braced. Aquariums in particular are worth thinking about — even small vibration can stress fish, though most tolerate a day of activity without long-term impact.
Prepare for Dust
Close all interior doors to rooms not being actively used. This limits dust migration between spaces. Consider changing HVAC filters immediately after the project completes.
Exterior Preparation
The area around the home needs the most attention. This is where debris will land, where crews will stage material, and where the disposal bin will sit.
Move Vehicles
Park all vehicles well away from the house — ideally on the street or at a neighbour's driveway if arrangements can be made. Debris can travel further than expected, and even careful crews cannot control every stray fragment. Your driveway may also be needed for the disposal bin and material delivery.
Move Outdoor Furniture and Belongings
Anything within the fall zone of the roof should be moved or covered:
- Patio furniture, cushions, umbrellas
- Barbecues and outdoor kitchens
- Planters, garden decorations, statues
- Children's play equipment
- Outdoor rugs and mats
- Bird feeders and hanging planters
Move items into the garage, a shed, or a covered area at least 15 to 20 feet from the house perimeter.
Protect Landscaping
Discuss vulnerable plants with your contractor in advance. Delicate flowerbeds, ornamental shrubs, and prized garden features can be protected with plywood or drop cloths during the work. Trees and larger shrubs generally handle the disruption fine, but delicate landscaping needs specific attention.
Take Down Wind Chimes and Small Fixtures
Wind chimes, decorative flags, small hanging fixtures, and outdoor holiday decorations near the roofline should come down. Vibration from the roof can dislodge poorly secured items, and they are in the way of proper access.
Cover Pool and Water Features
If you have an in-ground or above-ground pool near the house, cover it during the installation. Debris in the pool creates significant cleanup work and can damage filtration systems.
Plan Access to the Property
Confirm with your contractor where material will be delivered, where the disposal bin will sit, and where the crew will park. Move anything blocking access — including bicycles, garbage bins, and yard equipment.
Pet Considerations
Pets are particularly affected by roof installation. The noise, vibration, and unfamiliar activity are distressing to most animals, and even normally calm pets may act unpredictably.
Best practices:
- Dogs: Arrange for daycare, a friend's home, or a family member's care during the loudest phases — especially tear-off day
- Cats: Secure indoors in a quiet interior room away from the work area, with food, water, and a litter box
- Birds: Move cages to the most interior room possible, or arrange for temporary care elsewhere
- Small pets: Rabbits, guinea pigs, hamsters — move enclosures to quieter interior areas
- Fish: Aquariums generally tolerate the day, but consider covering the tank to prevent debris from entering during any window ventilation
All pets should be secured during the workday whether or not they are typically loose. Crews go in and out through gates and doors, and even well-behaved pets can bolt in unfamiliar circumstances.
Kids and Household Members
Roof installation is not a good day for young children to be at home. The noise is intense, the outdoor space is off-limits for safety, and vibration inside the house can be startling. Common approaches:
- Arrange daycare or grandparent care for the day, especially during tear-off
- Schedule outings — parks, libraries, museums, or shopping trips
- If children must be home, keep them in an interior room with entertainment and away from windows facing the work
Older kids and teens may find the process interesting to observe from a safe distance, but should stay well away from the fall zone at all times.
Timing and Weather Considerations
When you schedule matters. Ontario's roofing season runs from spring through fall, with peak demand in late spring and fall. Winter installations are possible for specific scenarios — see our overview on winter roofing — but require specific weather windows and product considerations.
Once scheduled, watch the weather forecast in the days leading up to installation. Your contractor monitors this closely and will contact you if the schedule needs to shift. A shift is preferable to installing under marginal conditions.
What to Expect on Installation Day
Knowing what a typical day looks like reduces stress and helps you plan accordingly.
Early Morning
The crew typically arrives between 7 and 8 AM. They will set up ground tarps, position ladders, stage safety equipment, and prepare the disposal bin area. This phase is quieter and lets you meet the crew lead if you are home.
Tear-Off
The loudest phase of the project. Old roofing is removed and dropped into the disposal bin. Expect several hours of significant noise and impact. This is when families with sensitive members should be elsewhere.
Deck Inspection and Repairs
Once the deck is exposed, the crew inspects for damage and discusses any needed repairs with you before proceeding. Deck repairs are one of the most common change-order situations on any roofing project.
Underlayment and Installation
Ice and water shield, underlayment, and new roofing material go on progressively. Noise reduces to steady but manageable hammering and stapling. Most of the day sits in this phase.
Cleanup
The crew performs a thorough sweep — including magnetic sweeps for nails — of the property before leaving. Our overview of residential job site cleanup covers what proper cleanup looks like.
Final Walkthrough
If you are home at project completion, the crew lead will walk the site with you to review the work and answer any questions.
What to Have on Hand
A few items make the day easier for both you and the crew:
- Access to a bathroom (many contractors bring their own facilities on longer jobs)
- Water or coffee for the crew — always appreciated, never expected
- Contact information for anyone who should be reached during the day
- Your written contract and any warranty paperwork accessible
- Your phone charged and available
After the Project: The Next Few Days
Once the crew leaves, complete these follow-up items:
- Do a walkaround of the property and note anything you want to bring up with the contractor
- Check for stray nails in the driveway and lawn — the magnetic sweep catches most but not always all
- Reinstall any items you removed for the project
- File warranty documents somewhere accessible for future reference
- Consider setting a reminder for annual roof maintenance — see our autumn maintenance checklist
- Update home insurance if your new roof qualifies for reduced premiums
Common Mistakes That Cause Problems
After many projects, the same avoidable issues come up:
Not moving vehicles. Debris damage to a car parked too close to the house is the most common preventable issue.
Leaving fragile items on interior walls. Vibration is stronger than most homeowners expect. Framed art has fallen and broken more than once on projects where the homeowner assumed it would be fine.
Not securing pets. A dog bolting from a gate left open by the crew during material delivery is a real and preventable risk.
Adding to the scope last-minute. Deciding to add gutters, ventilation, or other work during the project itself creates delays and complicates pricing. Discuss additions during the estimate phase or well before installation. See our guide on hiring roofing contractors for what to cover during initial conversations.
Assuming the crew handles everything. Cleanup is thorough but not perfect. Some homeowner follow-up is normal.
Get Your Free Estimate
Planning a roof project? Our team will walk your home, discuss the scope, and give you a detailed written estimate — with clear guidance on what to expect from planning through completion.
Fill out the form or reach us directly.
Call us at (613) 259-5766 or contact us to schedule your on-site assessment.
Small Preparation, Big Difference
A few hours of preparation before installation day pays back many times over in project experience. Protected belongings, secured pets, informed neighbours, and clear access all add up to a smoother, less stressful project — and a home that transitions cleanly from old roof to new. McKay Roofing has been guiding Ottawa Valley homeowners through this process for more than 50 years, and we are happy to answer any question about how to prepare for your specific project.